Much of what I’m going to cover here I got from “Basic Principles of Design” by Manfred Maier. It’s a part of the Foundation Program at the School of Design Basel, Switzerland series. I’m lucky enough to have access to my wife’s copy which originally belonged to her father, Robin Rickabaugh.
This is a one-of-a-kind set of books covering the development of basic skills as they were taught at this prestigious design program in the late 1970s. I’ve updated some of the exercises for computer execution, here, but there is no substitute for what you learn through hand work.
The concept of color as an expression of personal taste is thoroughly rejected by Maier. Instead, he focuses on guiding students through a series of exercises that gives them an objective understanding of color through constant exploration of relationships. Color cannot be seen in isolation, but has to be understood in relation to other colors.
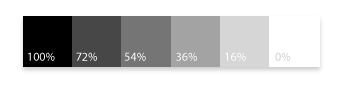
A regular task for web designers is generating an original palette of harmonized but value-contrasted colors. Understanding value progression and how to generate a lively series of colors that contrast adequately. One way I do this is to create a series of gray scale boxes to guide your values
It’s tempting to just set a white box and a black box and use Illustrator’s blend tool to find the intervening values. However, that doesn’t really work. Human eyes work differently from computer values. Here’s an automatic progression with resulting grayscale percentages:

Auto-generated gray scale using Illustrator blend tool.
Notice especially the relative difference of the black with the 80% box. They appear relatively close compared to the relationship of the 80% to the 60%. The difference between the 60% and the 40% seems even greater.
Instead, a more useful method is to set up your own value spectrums (which you can of course reuse regularly, once you’ve spent the initial time investment to create them). Here is my version of the above 5-step value spectrum:
Blend scale adjusted by eye.
A more-complex palette might have many more steps. Having a well-calibrated monitor will help you get great results.
From this point, we can use this spectrum to create a well-contrasted palette. For instance, we could create a split complement in this way:

Colors modulated against grayscale values, keeping saturation the same.
It helps to work in the Hue, Saturation, Brightness (HSB) setting on Illustrator’s color palette.
In this exercise, I’m regulating only value and hue, but trying to keep my saturation consistent. In a future post, I’ll cover exercises exploring changes in value and saturation, or all three together.
I’m making changes visually, not by just setting the Saturation slider. I find it helps to squint at the color/gray relationship and adjust value or saturation until I see no line between the gray and the color. Try it now for yourself.
Once we’ve got the colors contrasting well, pull the gray off the color and see them in relationship to one another by themselves. This will let you make fine adjustments and be sure that it’s a successful solution.
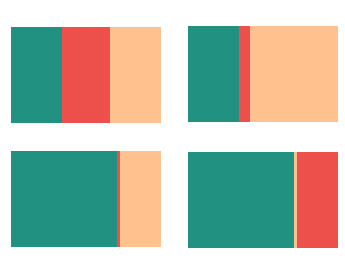
Finally, color is changed by the proportion of one color to the other colors. So we can create many different effects just by varying relative amounts of color:
That’s the lesson for today, but I’ve got one final note:
The process used by the School of Design, Basel is non-reductive: At no point is it assumed that the student should already understand color. Instead, they are brought to understanding through rigorous exploration of color. Practice is central to learning: the color guide in Adobe Illustrator is no substitute for our eyes and iteration of many color ideas during the design process.
Guides are a good start, but they should never rule the design.